This project focuses on building a modern Todo Web Application using the Django web framework. The application allows users to create, manage, edit, and delete tasks through a clean and interactive interface.
- Displays a list of all tasks for users to view and manage efficiently.
- Provides functionality to add new tasks instantly through a simple input form.
- Allows users to edit existing tasks inline without navigating to a separate page.
- Supports deleting individual tasks or clearing all tasks at once.
- Uses Django’s backend logic with secure POST requests and CSRF protection.
Basic setup
Create a virtual environment, and install the package:
pip install Django
Step 1: Create a Django Project
Start a new Django project named todo_project. This sets up the base project directory and essential files (such as settings and URL configurations) required to build your Django application.
django-admin startproject todo_project
Step 2: Navigate to the Project Directory
cd todo_project
Step 3: Create a Django App
Create an app named todo, where the core logic of Todo application (models, views, templates, etc.) will reside.
python manage.py startapp todo
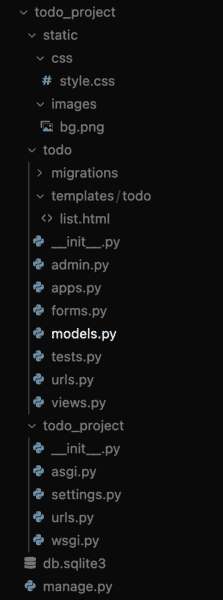
The directory structure should now include the todo app inside project:
Step 4: Add the todo App to Settings
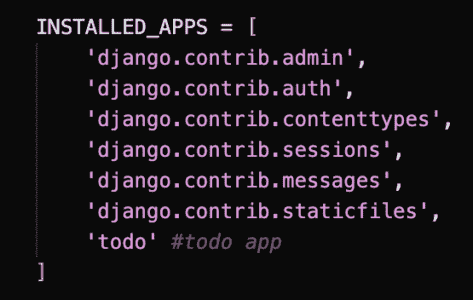
Open todo_project/settings.py and add 'todo' to the INSTALLED_APPS list. This registers the app so Django includes it in migrations, the admin panel, and template loading.
Also add static configuration:
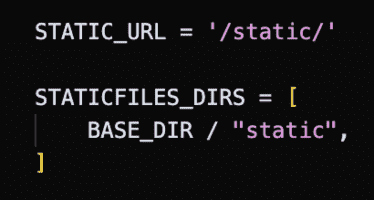
This allows Django to load CSS and images from a static folder.
Step 5: Configure URLs
In todo/urls.py, create app urls:
from django.urls import path
from . import views

urlpatterns = [
    path('', views.todo_list, name='todo_list'),
]
Edit todo_project/urls.py to include the todo app urls:
from django.contrib import admin
from django.urls import path, include

urlpatterns = [
    path('admin/', admin.site.urls),
    path('', include('todo.urls')),
]
This connects your application views to the main project routing system.
Step 6: Define the ToDo Model
Edit todo/models.py to define the todo model:
from django.db import models

class Todo(models.Model):
    title = models.CharField(max_length=200)

    def __str__(self):
        return self.title
The model represents a single task and stores it in the database.
Step 7: Create Views
Edit todo/views.py:
from django.shortcuts import render, redirect, get_object_or_404
from .models import Todo


def todo_list(request):
    todos = Todo.objects.all()

    if request.method == "POST":

        # Add Task
        if "add_task" in request.POST:
            title = request.POST.get("title")
            if title:
                Todo.objects.create(title=title)
            return redirect("todo_list")

        # Edit Task
        if "edit_task" in request.POST:
            task_id = request.POST.get("task_id")
            new_title = request.POST.get("new_title")
            todo = get_object_or_404(Todo, id=task_id)
            todo.title = new_title
            todo.save()
            return redirect("todo_list")

        # Delete Task
        if "delete_task" in request.POST:
            task_id = request.POST.get("task_id")
            todo = get_object_or_404(Todo, id=task_id)
            todo.delete()
            return redirect("todo_list")

        # Clear All
        if "clear_all" in request.POST:
            Todo.objects.all().delete()
            return redirect("todo_list")

    return render(request, "todo/list.html", {
        "todos": todos,
        "task_count": todos.count()
    })
In the above code:
- Handles all CRUD operations for the Todo model within a single view function.
- Processes POST requests to add, update, delete, or clear tasks using Django’s ORM.
- Renders the template with updated task data following Django’s request–response cycle.
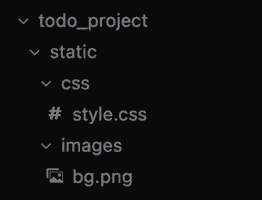
Step 8: Create Static Folder Structure
Inside the project root directory (the same level where manage.py is located), create a static folder.
- Inside the static folder, create two subfolders named css and images.
- Inside the css folder, create a file named style.css.
- Inside the images folder, place your background image file named bg.jpg.
Step 9: Create the Template
Create the folder todo/templates/todo/ and add list.html:
{% load static %}
<!DOCTYPE html>
<html>
<head>
    <title>Todo App</title>
    <meta name="viewport" content="width=device-width, initial-scale=1">

    <link rel="stylesheet" href="{% static 'css/style.css' %}">
</head>
<body>

<div class="todo-container">
    <h2>Todo App</h2>

    <!-- ADD TASK -->
    <form method="POST">
        {% csrf_token %}
        <div class="input-group">
            <input type="text" name="title" placeholder="Add your new todo" required>
            <button type="submit" name="add_task" class="add-btn">+</button>
        </div>
    </form>

    <!-- TASK LIST -->
    {% for todo in todos %}
    <div class="task">

        <!-- NORMAL TEXT -->
        <div id="text-{{ todo.id }}" class="task-text">
            {{ todo.title }}
        </div>

        <!-- EDIT MODE -->
        <form method="POST"
              id="edit-{{ todo.id }}"
              class="edit-form"
              style="display:none;">
            {% csrf_token %}
            <input type="hidden" name="task_id" value="{{ todo.id }}">
            <input type="text"
                   name="new_title"
                   value="{{ todo.title }}"
                   class="edit-input"
                   required>
            <button type="submit"
                    name="edit_task"
                    class="btn btn-save">
                ✔
            </button>
        </form>

        <!-- BUTTONS -->
        <div class="btn-group">
            <button type="button"
                    onclick="enableEdit({{ todo.id }})"
                    class="btn btn-edit">
                ✏
            </button>

            <form method="POST">
                {% csrf_token %}
                <input type="hidden" name="task_id" value="{{ todo.id }}">
                <button type="submit"
                        name="delete_task"
                        class="btn btn-delete">
                    🗑
                </button>
            </form>
        </div>

    </div>
    {% empty %}
        <p>No tasks yet</p>
    {% endfor %}

    <!-- FOOTER -->
    <div class="footer">
        <span>You have {{ task_count }} tasks</span>

        <form method="POST">
            {% csrf_token %}
            <button type="submit"
                    name="clear_all"
                    class="clear-btn">
                Clear All
            </button>
        </form>
    </div>
</div>

<script>
function enableEdit(id) {
    document.getElementById("text-" + id).style.display = "none";
    document.getElementById("edit-" + id).style.display = "flex";
}
</script>

</body>
</html>
In the above html file:
- Displays all tasks dynamically
- Shows a form to add tasks
- Provides inline edit functionality
- Includes delete buttons using POST
- Uses CSRF protection
- Loads external CSS
Step 10: Create External CSS
In style.css:
body {
    margin: 0;
    font-family: "Segoe UI", Arial, sans-serif;
    height: 100vh;
    display: flex;
    justify-content: center;
    align-items: center;
    background: url("../images/bg.png") no-repeat center center/cover;
    position: relative;
}

body::before {
    content: "";
    position: absolute;
    width: 100%;
    height: 100%;
    background: rgba(0, 0, 0, 0.25);
    z-index: 0;
}

.todo-container {
    position: relative;
    z-index: 1;
    width: 500px;
    padding: 35px;
    border-radius: 18px;
    background: rgba(255, 255, 255, 0.95);
    box-shadow: 0 15px 35px rgba(0, 0, 0, 0.2);
}

h2 {
    text-align: center;
    margin-bottom: 30px;
    font-weight: 600;
}

.input-group {
    display: flex;
    margin-bottom: 30px;
}

.input-group input {
    flex: 1;
    padding: 14px;
    border-radius: 12px 0 0 12px;
    border: 1px solid #ddd;
    font-size: 15px;
    outline: none;
}

.input-group input:focus {
    border-color: #6c5ce7;
}

.add-btn {
    background: #6c5ce7;
    color: white;
    border: none;
    padding: 0 24px;
    border-radius: 0 12px 12px 0;
    font-size: 20px;
    cursor: pointer;
    transition: 0.2s ease;
}

.add-btn:hover {
    background: #574bce;
}

.task {
    background: #f4f4f4;
    padding: 18px;
    border-radius: 14px;
    margin-bottom: 18px;
    display: flex;
    align-items: center;
    justify-content: space-between;
    gap: 18px;
    transition: background 0.2s ease;
}

.task:hover {
    background: #ededed;
}

.task-text {
    flex: 1;
    font-size: 16px;
}

.edit-input {
    flex: 1;
    padding: 10px 14px;
    border-radius: 10px;
    border: 1px solid #ccc;
    font-size: 14px;
}

.btn-group {
    display: flex;
    gap: 12px;
}

.btn {
    border: none;
    padding: 8px 14px;
    border-radius: 10px;
    cursor: pointer;
    font-size: 14px;
    transition: 0.2s ease;
}

.btn-edit {
    background: #f39c12;
    color: white;
}

.btn-edit:hover {
    background: #d68910;
}

.btn-save {
    background: #2ecc71;
    color: white;
}

.btn-save:hover {
    background: #27ae60;
}

.btn-delete {
    background: #e74c3c;
    color: white;
}

.btn-delete:hover {
    background: #c0392b;
}

.footer {
    margin-top: 30px;
    display: flex;
    justify-content: space-between;
    align-items: center;
    font-size: 15px;
}

.clear-btn {
    background: #6c5ce7;
    color: white;
    border: none;
    padding: 10px 18px;
    border-radius: 12px;
    cursor: pointer;
    transition: 0.2s ease;
}

.clear-btn:hover {
    background: #574bce;
}

p {
    text-align: center;
    color: #777;
}
In the above css file:
- Styles the layout and buttons
- Applies background image
- Creates the glass-style card effect
- Improves spacing and UI design
Step 11: Apply Migrations
Create and apply migrations to set up the database schema:
python manage.py makemigrations
python manage.py migrate
Step 12: Run the Development Server
Start the Django development server:
python manage.py runserver
Visit: http://127.0.0.1:8000/ to see the todo app
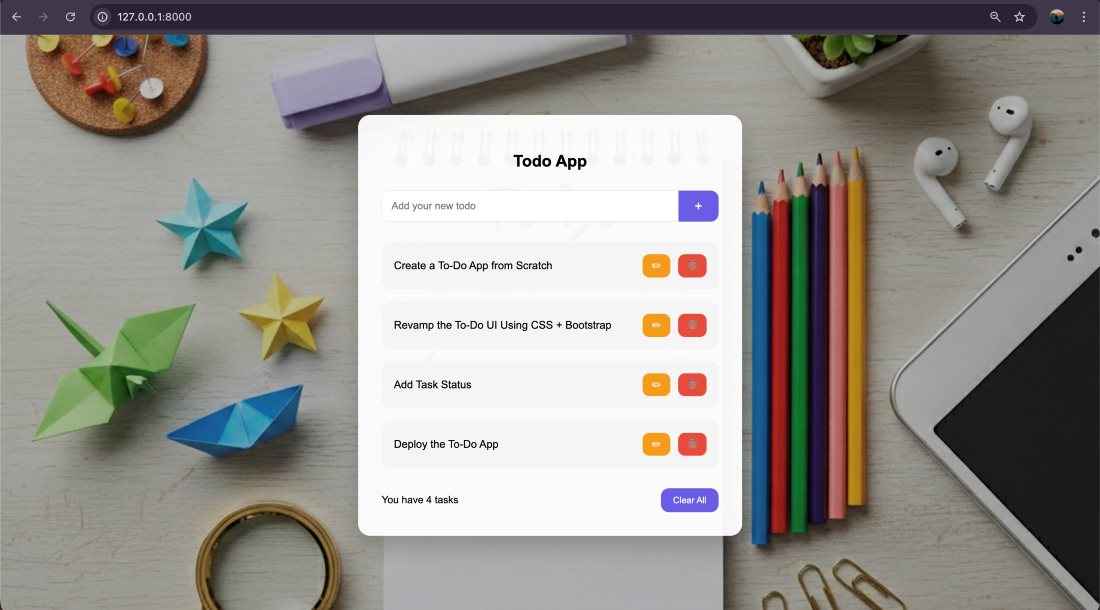
Output: