Fazendo plugins
Sobre plugins
Um plug-in é uma ótima maneira de ampliar o editor com ferramentas úteis. Pode ser feito inteiramente com GDScript e cenas padrão, sem precisar recarregar o editor. Ao contrário dos módulos, você não precisa criar código C++ nem recompilar o editor. Embora isso torne os plug-ins menos poderosos, ainda há muitas coisas que você pode fazer com eles. Observe que um plug-in é semelhante a qualquer cena que você já pode criar, exceto que é criado usando um script para adicionar a funcionalidade do editor.
This tutorial will guide you through the creation of two plugins so you can understand how they work and be able to develop your own. The first is a custom node that you can add to any scene in the project, and the other is a custom dock added to the editor.
Criando um plugin
Antes de começar, crie um novo projeto vazio onde quiser. Isso servirá como base para desenvolver e testar os plugins.
A primeira coisa que você precisa para o editor identificar um novo plugin é criar dois arquivos: um plugin.cfg para configuração e um script de ferramenta com a funcionalidade. Plugins tem um caminho padrão como addons/plugin_name dentro da pasta do projeto. Godot fornece uma caixa de diálogo para gerar esses arquivos e colocá-los onde precisam estar.
In the main toolbar, click the Project dropdown. Then click
Project Settings.... Go to the Plugins tab and then click
on the button in the top-right.
Você verá a caixa de diálogo aparecer, assim:
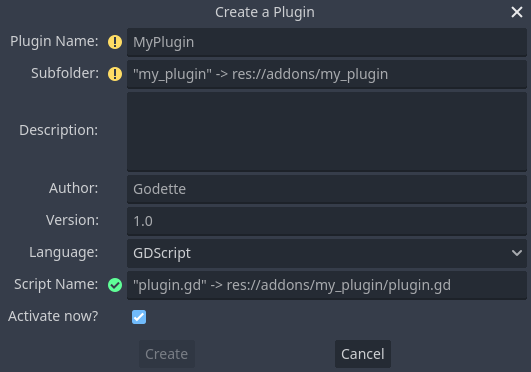
The placeholder text in each field describes how it affects the plugin's creation of the files and the config file's values.
Para continuar com o exemplo, utilize os seguintes valores:
Plugin Name: My Custom Node
Subfolder: my_custom_node
Description: A custom node made to extend the Godot Engine.
Author: Your Name Here
Version: 1.0.0
Language: GDScript
Script Name: custom_node.gd
Plugin Name: My Custom Node
Subfolder: MyCustomNode
Description: A custom node made to extend the Godot Engine.
Author: Your Name Here
Version: 1.0.0
Language: C#
Script Name: CustomNode.cs
Aviso
In C#, the EditorPlugin script needs to be compiled, which
requires building the project. After building the project the plugin can be
enabled in the Plugins tab of Project Settings.
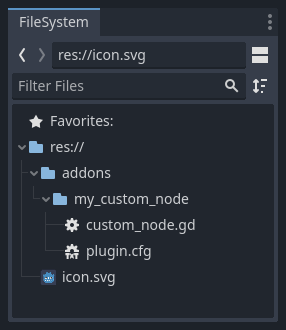
Você deve acabar com uma estrutura de diretório como esta:
plugin.cfg is an INI file with metadata about your plugin.
The name and description help people understand what it does.
Your name helps you get properly credited for your work.
The version number helps others know if they have an outdated version;
if you are unsure on how to come up with the version number, check out Semantic Versioning.
The main script file will instruct Godot what your plugin does in the editor
once it is active.
O arquivo de script
Upon creation of the plugin, the dialog will automatically open the
EditorPlugin script for you. The script has two requirements that you cannot
change: it must be a @tool script, or else it will not load properly in the
editor, and it must inherit from EditorPlugin.
Aviso
In addition to the EditorPlugin script, any other GDScript that your plugin uses
must also be a tool. Any GDScript without @tool used by the editor
will act like an empty file!
It's important to deal with initialization and clean-up of resources. A good practice is to use the virtual function _enter_tree() to initialize your plugin and _exit_tree() to clean it up. Thankfully, the dialog generates these callbacks for you. Your script should look something like this:
@tool
extends EditorPlugin


func _enter_tree():
    # Initialization of the plugin goes here.
    pass


func _exit_tree():
    # Clean-up of the plugin goes here.
    pass
#if TOOLS
using Godot;

[Tool]
public partial class CustomNode : EditorPlugin
{
    public override void _EnterTree()
    {
        // Initialization of the plugin goes here.
    }

    public override void _ExitTree()
    {
        // Clean-up of the plugin goes here.
    }
}
#endif
Este é um bom modelo para usar ao criar novos plugins.
Um nó personalizado
Às vezes, você deseja um determinado comportamento em muitos nós, como uma cena ou controle personalizado que pode ser reutilizado. A instanciação é útil em muitos casos, mas às vezes pode ser complicada, especialmente se você a estiver usando em muitos projetos. Uma boa solução para isso é criar um plugin que adicione um nó com um comportamento personalizado.
For this tutorial, we'll create a button that prints a message when clicked. For that, we'll need a script that extends from Button. It could also extend BaseButton if you prefer:
# Optional, add to execute in the editor.
@tool

# Icons are optional.
# Alternatively, you may use the UID of the icon or the absolute path.
@icon("icon.png")

# Automatically register the node in the Create New Node dialog
# and make it available for use with other scripts.
class_name MyButton
extends Button


func _enter_tree():
    pressed.connect(clicked)


func clicked():
    print("You clicked me!")
using Godot;

// Optional, add to execute in the editor.
[Tool]

// Icons are optional.
// Alternatively, you may use the UID of the icon or the absolute path.
[Icon("icon.png")]

// Automatically register the node in the Create New Node dialog
// and make it available for use with other scripts.
[GlobalClass]
public partial class MyButton : Button
{
    public override void _EnterTree()
    {
        Pressed += Clicked;
    }

    public void Clicked()
    {
        GD.Print("You clicked me!");
    }
}
That's it for our basic button. You can save this as my_button.gd inside the
plugin folder. You may have a 16×16 icon to show in the scene tree. If you
don't have one, you can grab the default one from the engine and save it in your
addons/my_custom_node folder as icon.png, or use the default Godot logo
(preload("res://icon.svg")).
Dica
SVG images that are used as custom node icons should have the Editor > Scale With Editor Scale and Editor > Convert Colors With Editor Theme import options enabled. This allows icons to follow the editor's scale and theming settings if the icons are designed with the same color palette as Godot's own icons.
Feito isso, o plugin já deve estar disponível na lista de plugins em Configurações do Projeto, então ative-o conforme explicado em Verificando os resultados.
Em seguida, experimente-o adicionando seu novo nó:
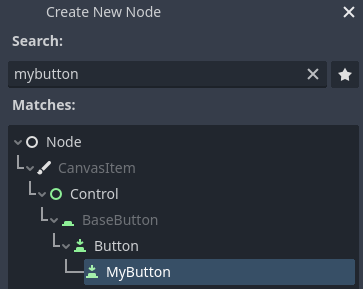
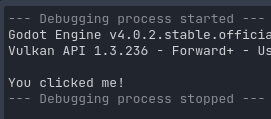
Ao adicionar o nó, você pode ver que ele já tem o script que você criou anexado a ele. Defina um texto para o botão, salve e execute a cena. Ao clicar no botão, você pode ver algum texto no console:
Um painel personalizado
Às vezes, você precisa estender o editor e adicionar ferramentas que estão sempre disponíveis. Uma maneira fácil de fazer isso é adicionar um novo dock com um plug-in. Docks são apenas cenas baseadas em Control, então elas são criadas de forma semelhante às cenas GUI usuais.
A criação de um painel personalizado é feita exatamente como um nó personalizado. Crie um novo arquivo plugin.cfg na pasta addons/my_custom_dock e adicione o seguinte conteúdo a ele:
[plugin]

name="My Custom Dock"
description="A custom dock made so I can learn how to make plugins."
author="Your Name Here"
version="1.0"
script="custom_dock.gd"
[plugin]

name="My Custom Dock"
description="A custom dock made so I can learn how to make plugins."
author="Your Name Here"
version="1.0"
script="CustomDock.cs"
Em seguida, crie o script custom_dock.gd na mesma pasta. Preencha-o com o template que vimos antes para começar bem.
Como estamos tentando adicionar um novo painel personalizado, precisamos criar o conteúdo do painel. Isso nada mais é do que uma cena padrão do Godot: basta criar uma nova cena no editor e editá-la.
For an editor dock, the root node must be a Control or one of its child classes. For this tutorial, you can create a single button. Don't forget to add some text to your button.

Save this scene as my_dock.tscn. Now, we need to grab the scene we created
then add it as a dock in the editor. For this, you can rely on the function
add_dock() from the
EditorPlugin class.
You need to select a dock position and define the control to add (which is the scene you just created). Don't forget to remove the dock when the plugin is deactivated. The script could look like this:
@tool
extends EditorPlugin


# A class member to hold the dock during the plugin life cycle.
var dock


func _enter_tree():
    # Initialization of the plugin goes here.
    # Load the dock scene and instantiate it.
    var dock_scene = preload("res://addons/my_custom_dock/my_dock.tscn").instantiate()

    # Create the dock and add the loaded scene to it.
    dock = EditorDock.new()
    dock.add_child(dock_scene)

    dock.title = "My Dock"

    # Note that LEFT_UL means the left of the editor, upper-left dock.
    dock.default_slot = DOCK_SLOT_LEFT_UL

    # Allow the dock to be on the left or right of the editor, and to be made floating.
    dock.available_layouts = EditorDock.DOCK_LAYOUT_VERTICAL | EditorDock.DOCK_LAYOUT_FLOATING

    add_dock(dock)


func _exit_tree():
    # Clean-up of the plugin goes here.
    # Remove the dock.
    remove_dock(dock)
    # Erase the control from the memory.
    dock.queue_free()
#if TOOLS
using Godot;

[Tool]
public partial class CustomDock : EditorPlugin
{
    private EditorDock _dock;

    public override void _EnterTree()
    {
        var _dock_scene = GD.Load<PackedScene>("res://addons/MyCustomDock/MyDock.tscn").Instantiate<Control>();
        AddControlToDock(DockSlot.LeftUl, _dock);

        // Create the dock and add the loaded scene to it.
        _dock = new EditorDock();
        _dock.AddChild(dock_scene);

        _dock.Title = "My Dock";

        // Note that LeftUl means the left of the editor, upper-left dock.
        _dock.DefaultSlot = DockSlot.LeftUl;

        // Allow the dock to be on the left or right of the editor, and to be made floating.
        _dock.AvailableLayouts = DockLayout.Horizontal | DockLayout.Floating;

        AddDock(_dock);
    }

    public override void _ExitTree()
    {
        // Clean-up of the plugin goes here.
        // Remove the dock.
        RemoveDock(_dock);
        // Erase the control from the memory.
        _dock.QueueFree();
    }
}
#endif
Note that, while the dock will initially appear at its specified position, the user can freely change its position and save the resulting layout.
Verificando os resultados
It's now time to check the results of your work. Open the Project Settings and click on the Plugins tab. Your plugin should be the only one on the list.

You can see the plugin is not enabled. Click the Enable checkbox to activate the plugin. The dock should become visible before you even close the settings window. You should now have a custom dock:

Registrando autoloads/singletons em plugins
It is possible for editor plugins to automatically register autoloads when the plugin is enabled. This also includes unregistering the autoload when the plugin is disabled.
This makes setting up plugins faster for users, as they no longer have to manually add autoloads to their project settings if your editor plugin requires the use of an autoload.
Use o seguinte código para registrar um singleton de um plugin de editor:
@tool
extends EditorPlugin

# Replace this value with a PascalCase autoload name, as per the GDScript style guide.
const AUTOLOAD_NAME = "SomeAutoload"


func _enable_plugin():
    # The autoload can be a scene or script file.
    add_autoload_singleton(AUTOLOAD_NAME, "res://addons/my_addon/some_autoload.tscn")


func _disable_plugin():
    remove_autoload_singleton(AUTOLOAD_NAME)
#if TOOLS
using Godot;

[Tool]
public partial class MyEditorPlugin : EditorPlugin
{
    // Replace this value with a PascalCase autoload name.
    private const string AutoloadName = "SomeAutoload";

    public override void _EnablePlugin()
    {
        // The autoload can be a scene or script file.
        AddAutoloadSingleton(AutoloadName, "res://addons/MyAddon/SomeAutoload.tscn");
    }

    public override void _DisablePlugin()
    {
        RemoveAutoloadSingleton(AutoloadName);
    }
}
#endif
Using sub-plugins
Often a plugin adds multiple things, for example a custom node and a panel. In those cases it might be easier to have a separate plugin script for each of those features. Sub-plugins can be used for this.
First create all plugins and sub plugins as normal plugins:

Then move the sub plugins into the main plugin folder:

Godot will hide sub-plugins from the plugin list, so that a user can't enable or disable them. Instead the main plugin script should enable and disable sub-plugins like this:
@tool
extends EditorPlugin

# The main plugin is located at res://addons/my_plugin/
const PLUGIN_NAME = "my_plugin"

func _enable_plugin():
    EditorInterface.set_plugin_enabled(PLUGIN_NAME + "/node", true)
    EditorInterface.set_plugin_enabled(PLUGIN_NAME + "/panel", true)

func _disable_plugin():
    EditorInterface.set_plugin_enabled(PLUGIN_NAME + "/node", false)
    EditorInterface.set_plugin_enabled(PLUGIN_NAME + "/panel", false)
Indo além
Now that you've learned how to make basic plugins, you can extend the editor in several ways. Lots of functionality can be added to the editor with GDScript; it is a powerful way to create specialized editors without having to delve into C++ modules.
You can make your own plugins to help yourself and share them in the Asset Library so that people can benefit from your work.