Criando o inimigo
Agora é hora de criarmos os inimigos de que nosso jogador terá que se desviar. Seu comportamento não será tão complexo: inimigos irão nascer aleatoriamente nos cantos da tela, escolher uma direção aleatória e irão se mover em linha reta.
Nós iremos construir uma cena Inimigo, que poderemos então instanciar para criar uma quantidade de inimigos independentes no jogo.
Configuração de nós
Click Scene -> New Scene from the top menu and add the following nodes:
RigidBody2D (chamado
Turba)
Não se esqueça de definir os filhos para que não possam ser selecionados, como você fez com a cena Player. Isso é feito selecionando o nó pai (RigidBody2D) no painel Scene, em seguida, usando o botão na parte superior do editor 2D (ou pressionando Ctrl + G).
Select the Mob node and set its Gravity Scale
property in the RigidBody2D
section of the inspector to 0.
This will prevent the mob from falling downwards.
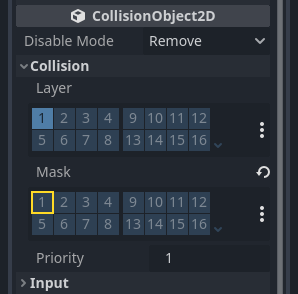
In addition, under the CollisionObject2D
section just beneath the RigidBody2D section,
expand the Collision group and
uncheck the 1 inside the Mask property.
This will ensure the mobs do not collide with each other.
Set up the AnimatedSprite2D like you did for the
player. This time, we have 3 animations: fly, swim, and walk. There
are two images for each animation in the art folder.
A propriedade Velocidade de Animação deve estar configurada para cada uma. Ajuste-a para 3 em todas as três animações.
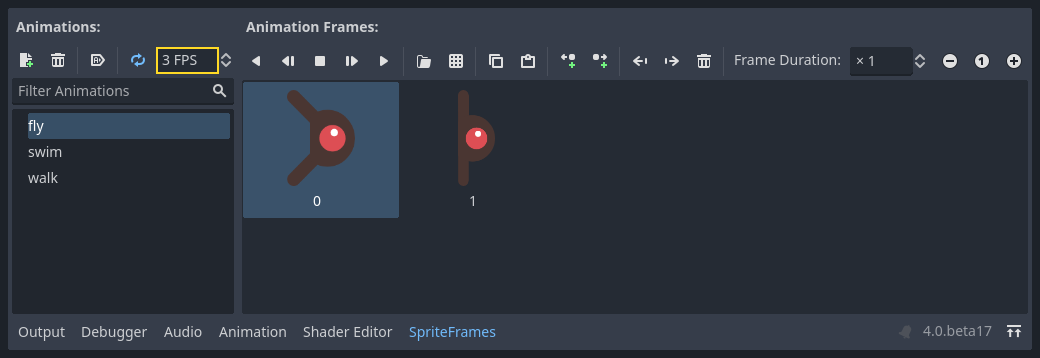
Você pode utilizar os botões "Tocar Animação" à direita do campo de entrada Velocidade de Animação para pré-visualizar suas animações.
Vamos selecionar uma das animações aleatoriamente para que os inimigos tenham alguma variedade.
Like the player images, these mob images need to be scaled down. Set the
AnimatedSprite2D's Scale property to (0.75, 0.75).
As in the Player scene, add a CapsuleShape2D for the collision. To align
the shape with the image, you'll need to set the Rotation property
to 90 (under "Transform" in the Inspector).
Salve a cena.
Script do inimigo
Adicione um script à ``Turba``assim:
extends RigidBody2D
using Godot;

public partial class Mob : RigidBody2D
{
    // Don't forget to rebuild the project.
}
Now let's look at the rest of the script. In _ready() we play the animation
and randomly choose one of the three animation types:
func _ready():
    var mob_types = Array($AnimatedSprite2D.sprite_frames.get_animation_names())
    $AnimatedSprite2D.animation = mob_types.pick_random()
    $AnimatedSprite2D.play()
public override void _Ready()
{
    var animatedSprite2D = GetNode<AnimatedSprite2D>("AnimatedSprite2D");
    string[] mobTypes = animatedSprite2D.SpriteFrames.GetAnimationNames();
    animatedSprite2D.Play(mobTypes[GD.Randi() % mobTypes.Length]);
}
First, we get the list of animation names from the AnimatedSprite2D's sprite_frames
property. This returns an Array containing all three animation names: ["walk",
"swim", "fly"].
In the GDScript code, we use the Array.pick_random method
to select one of these animation names at random. Meanwhile, in the C# code, we pick a random number
between 0 and 2 to select one of these names from the list (array indices start at 0). The
expression GD.Randi() % n selects a random integer between 0 and n-1.
Por fim, chamamos play() para começar a reproduzir a animação escolhida.
The last piece is to make the mobs delete themselves when they leave the screen.
Connect the screen_exited() signal of the VisibleOnScreenNotifier2D node
to the Mob and add this code:
func _on_visible_on_screen_notifier_2d_screen_exited():
    queue_free()
// We also specified this function name in PascalCase in the editor's connection window.
private void OnVisibleOnScreenNotifier2DScreenExited()
{
    QueueFree();
}
queue_free() é uma função que essencialmente 'libera', ou deleta, o nó ao final do quadro.
Isto completa a cena Turba.
Com o jogador e os inimigos prontos, na próxima parte os juntaremos em uma nova cena. Faremos inimigos aparecerem aleatoriamente na área do jogo, moverem-se adiante, tornando nosso projeto um jogo de fato.